前言
這篇文章主要會使用 Anaconda 來安裝 Python 虛擬環境啟動 Stable Diffusion WebUI,如果是 Python 開發者的話直接 clone WebUI repo 然後運行就可以。
注意:Stable Diffusion WebUI 僅支援 Python 3.10。更多內容請參考官方的文檔:Installation on Apple Silicon
Stable Diffusion WebUI 是什麼?
- Stable Diffusion (穩定擴散) 是一個擴散模型,2022年8月由德國CompVis協同Stability AI和Runway發表論文,並推出相關程式。
- 圖形化介面:同年,AUTOMATIC1111開發了圖形化界面:「Stable Diffusion WebUI」,這是能用AI技術生成圖片的開源軟體。
- 免費:SDWebUI 可以免費在自己的電腦或伺服器跑,且只要遵照 Creative ML OpenRAIL-M授權條款的話,基本無使用限制。
- 跨平台:SDWebUI 已支援 Linux/Windows/MacOS 系統,以及 Nvidia/AMD/Intel Arc/Apple Silicon M 的GPU。
系統需求
- 處理器:建議為搭配 Apple Silicon 晶片的 Mac(M1,M2)
- 記憶體:建議為 16GB(含)以上
- 作業系統:至少為 Monterey 12.3 以上
本文以 M1 pro, RAM 16GB, macOS Sonoma 14.0 為示範。
安裝 Git & Anaconda
1.安裝 Homebrew (若已安裝可跳過)
/bin/bash -c "$(curl -fsSL https://raw.githubusercontent.com/Homebrew/install/HEAD/install.sh)"2.再使用 Homebrew 安裝 git 和 Anaconda (若已安裝可跳過)
brew install git
brew install --cask anaconda
如果使用的是 zsh 還需要另外配置路徑:
echo 'export PATH="/opt/anaconda3/bin:$PATH"' >> ~/.zshrc
source ~/.zshrc
3.用 Anaconda 安裝 Python 3.10.6 的虛擬環境,按 y 同意之後會自動下載必要的套件:
conda create --name sdwebui python=3.10.6sdwebui是虛擬環境的名稱,可以自定義
啟動 Python 虛擬環境
將 stable-diffusion-webui clone 到本地:
cd ~
git clone https://github.com/AUTOMATIC1111/stable-diffusion-webui.git
接著用 conda 啟動剛剛新建的 Python 虛擬環境,terminal 提示符前面會變成(sdwebui):
conda activate sdwebui- 這個 sdwebui 就是前面指定的虛擬環境名稱
輸入 python --version 確認一下是否為 3.10.6 版本:

運行 WebUI
在虛擬環境中執行 webui.sh,它會自動下載 PyTorch 並安裝依賴套件。
cd ~/stable-diffusion-webui
./webui.sh
安裝過程需要一段時間,請耐心等待。
完成後會自動開啟 WebUI 頁面,通常 port 為 7860,使用的過程中請勿關閉 terminal:
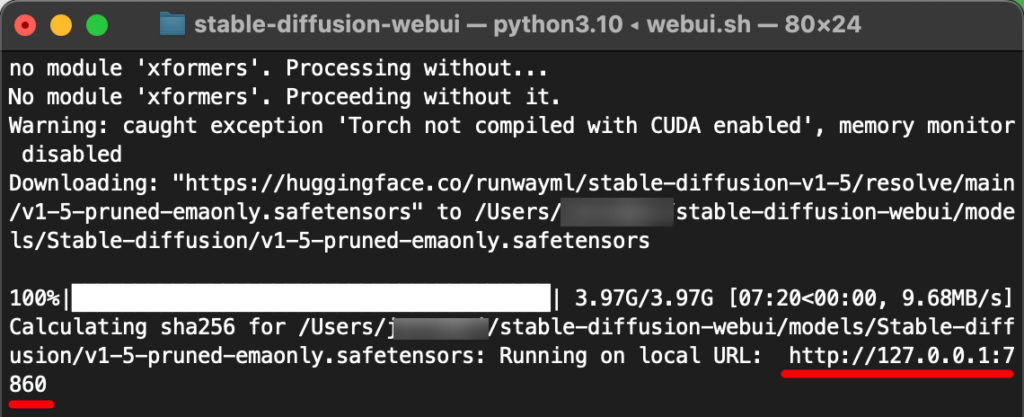
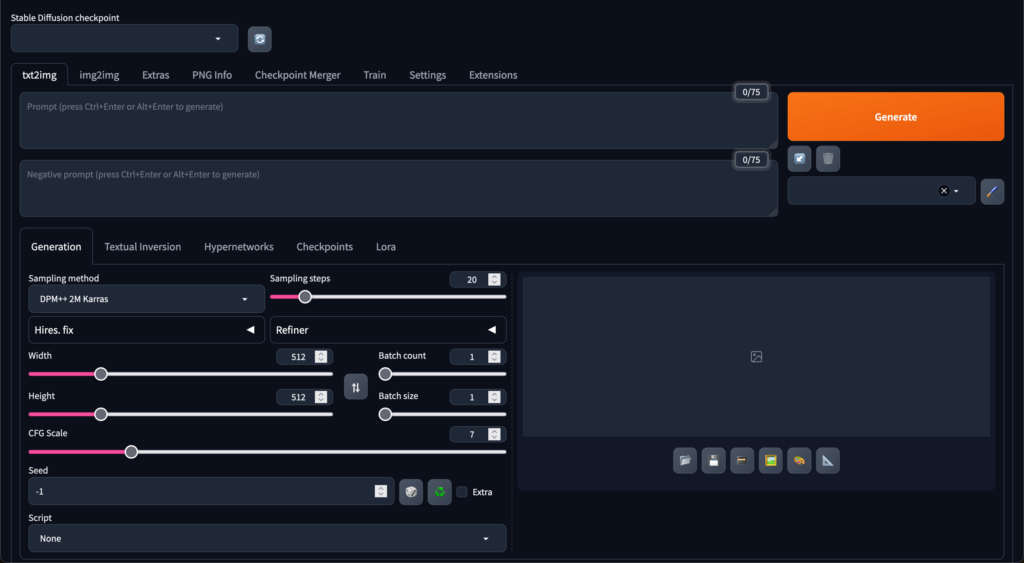
如果要停止運行,直接在 terminal 中按 ctrl+C 停止即可。
若日後要啟動 WebUI,直接輸入以下指令即可:
conda activate sdwebui
cd ~/stable-diffusion-webui
./webui.sh
Troubleshooting
Torch is not able to use GPU
完整錯誤訊息如下:
Traceback (most recent call last):
  File "/Users/user/stable-diffusion-webui/launch.py", line 48, in <module>
    main()
  File "/Users/user/stable-diffusion-webui/launch.py", line 39, in main
    prepare_environment()
  File "/Users/user/stable-diffusion-webui/modules/launch_utils.py", line 356, in prepare_environment
    raise RuntimeError(
RuntimeError: Torch is not able to use GPU; add --skip-torch-cuda-test to COMMANDLINE_ARGS variable to disable this check解決方式:
編輯 webui-user.sh,在剛剛修改的 COMMANDLINE_ARGS 後面加上參數 --skip-torch-cuda-test:
export COMMANDLINE_ARGS="--medvram --opt-split-attention --skip-torch-cuda-test"加完之後重新再跑一次 ./webui.sh
安裝 AI 模型
預設模型(checkpoint)只有一個,所以需要下載。

AI模型下載網站:Civitai
推薦幾個不錯的模型:
- GhostMix 遊戲角色 二次元 女性
- MothMix 動漫 半現實
- Ether Blu Mix 動漫 幻想 肖像 半現實
- LEOSAM’s HelloWorld SDXL Base Model 寫實
- XXMix_9realistic 真人 寫實 女性
- Meichidark_Mix 真人 寫實 女性
- SDXL Unstable Diffusers ☛ YamerMIX 動漫 動物 未來派 抽象 朋克…
- ⋅ ⊣ Realities Edge XL ⊢ ⋅ LCM+SDXLTurbo! 逼真 肖像 電影 藝術 3D
- Landscape Realistic Pro 真實 風景
- DreamShaper 3D 2D 動漫 景觀 寫實 科幻
- Shishkin landscape希施金风景油画
- Animation landscape/动漫风景
- Cyber Graphic 賽博朋克 海報
- Cyberpunk Anime Style 賽博朋克 動畫
單個 AI 模型動輒幾 GB,所以下載需要時間。
下載好的模型檔放到 stable-diffusion-webui/models/Stble-diffusion 目錄下後按 refresh icon 就可以讀取到了(不需要重啟WebUI):


模型副檔名為
.safetensors
使用 AI 文生圖
有多種生成方式,不過最基本的就是這兩種:
- txt2img:文生圖
- img2img:圖生圖
先試用一下文生圖,上方是正面關鍵詞下方是負面關鍵詞:
- 每個關鍵詞之間用逗號
,隔開 - 關鍵詞也可以是一句話
- 關鍵詞只能用英文描述

正面關鍵字用於描述生成的圖片應該擁有哪些內容:
1 girl,short hair,without bangs,tall,skinny,stage,microphone,audience負面關鍵詞是用來避免 AI 生成這些內容:
worst quality,grayscale,low quality這是生成後的結果:
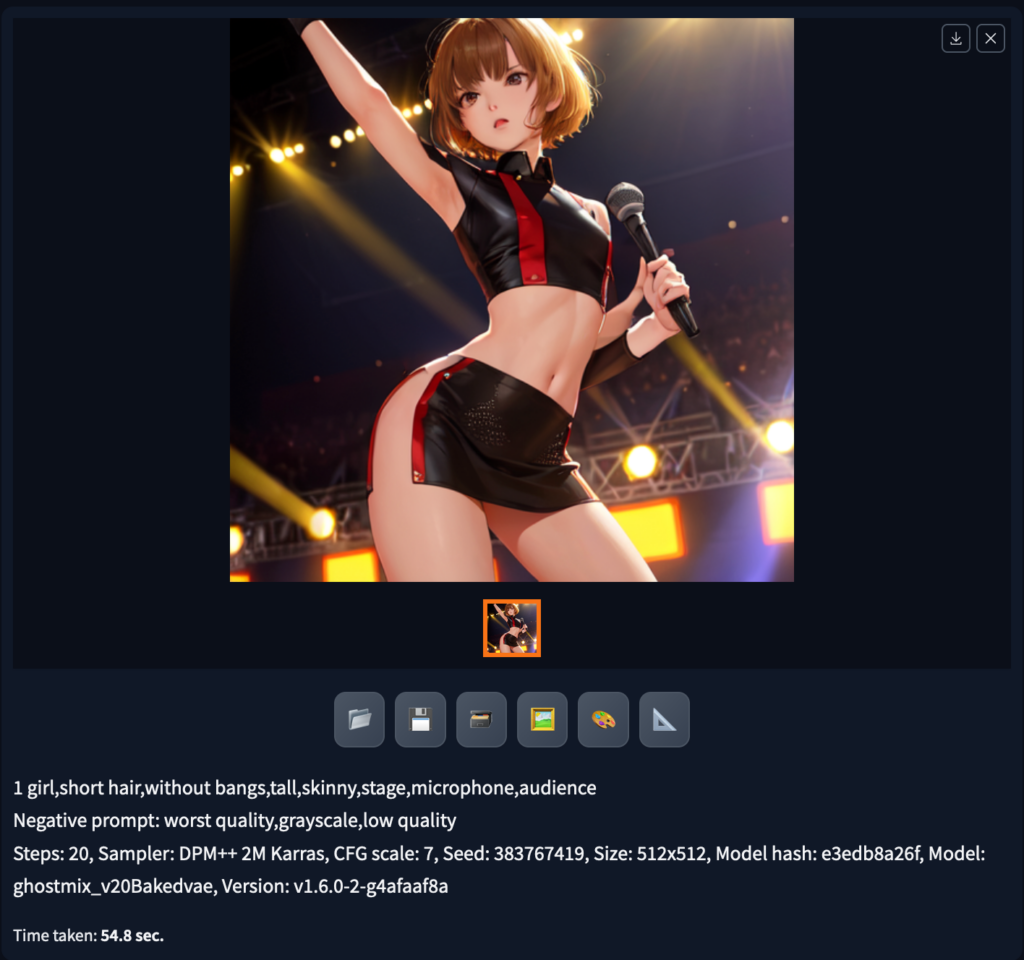
生成的圖片會自動保存到
~/stable-diffusion-webui/outputs/txt2img-images/<日期>目錄中,如果不要自動保存在Settings中將Always save all generated images取消勾選即可
關於關鍵詞如何下、參數如何設置,可以參考模型中的範例圖片,展開後會看到生成圖片用的關鍵詞和參數:
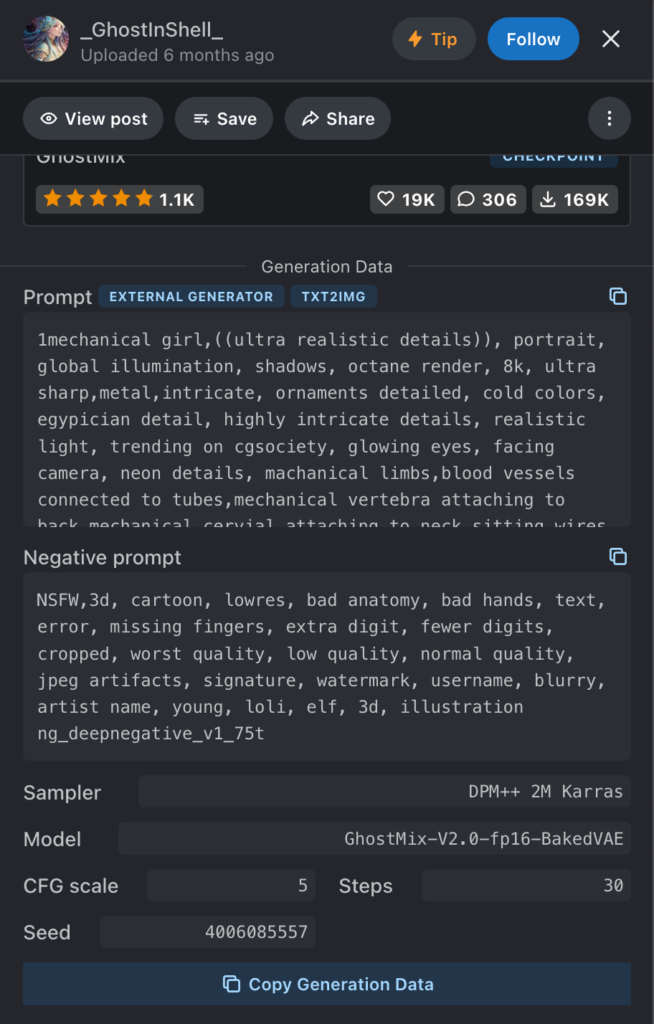
或者也有一些幫助生成關鍵字的插件,網上一搜就有滿多的。
Troubleshooting
Connection errored out
生成圖片時出現 Connection errored out.

檢查 terminal 發現有一個錯誤導致 WebUI 會自動關閉:
serWarning: resource_tracker: There appear to be 1 leaked semaphore objects to clean up at shutdown解決方式:
用文字編輯器打開 /Users/jennamei/stable-diffusion-webui/webui-user.sh 添加 --no-half 後重啟 WebUI 應該就可以解決了:
export COMMANDLINE_ARGS="--skip-torch-cuda-test --share --skip-version-check --no-half"Not enough memory, use lower resolution (max approx. 1152×1152).
完整錯誤訊息:
Not enough memory, use lower resolution (max approx. 1152x1152). Need: 2.4GB free, Have:1.0GB free就是設置的寬高太大了,記憶體不足,把解析度調小再生成就可以。
設置中文化/雙語對照介面
繁體中文擴充:https://github.com/benlisquare/stable-diffusion-webui-localization-zh_TW
雙語對照擴充:https://github.com/journey-ad/sd-webui-bilingual-localization
繁體中文介面
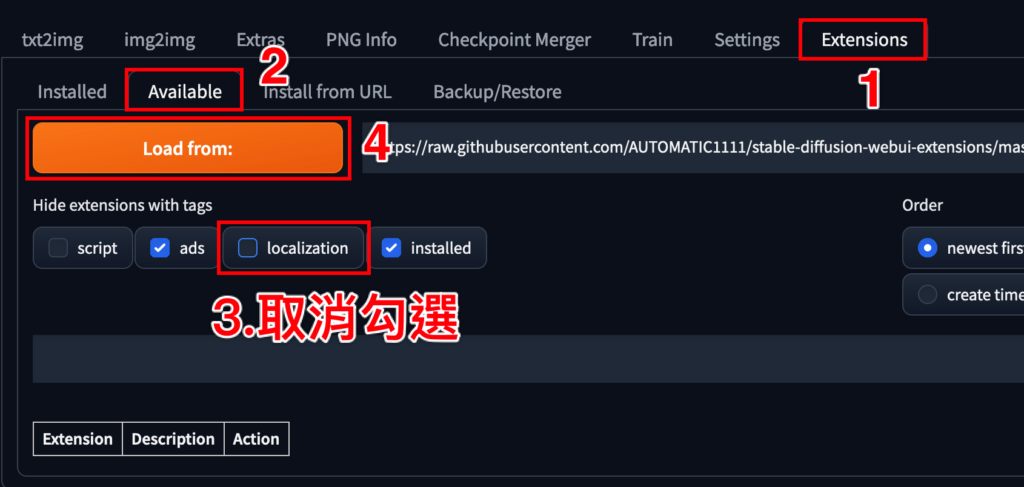
1.Extensions -> Available -> 取消勾選 localization -> Load from
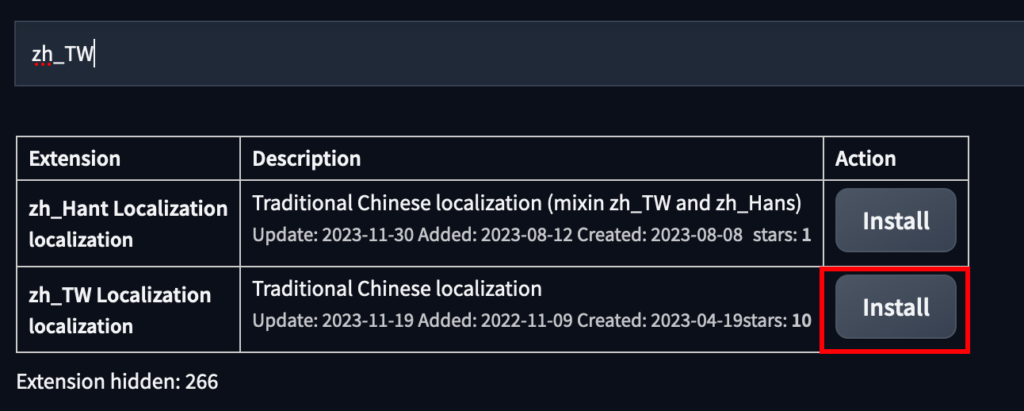
2.搜索 zh_TW 後按 Install
3.切到 Installed 標籤頁,勾選剛剛下載的 zh_TW 擴展後按 Apply and restart UI

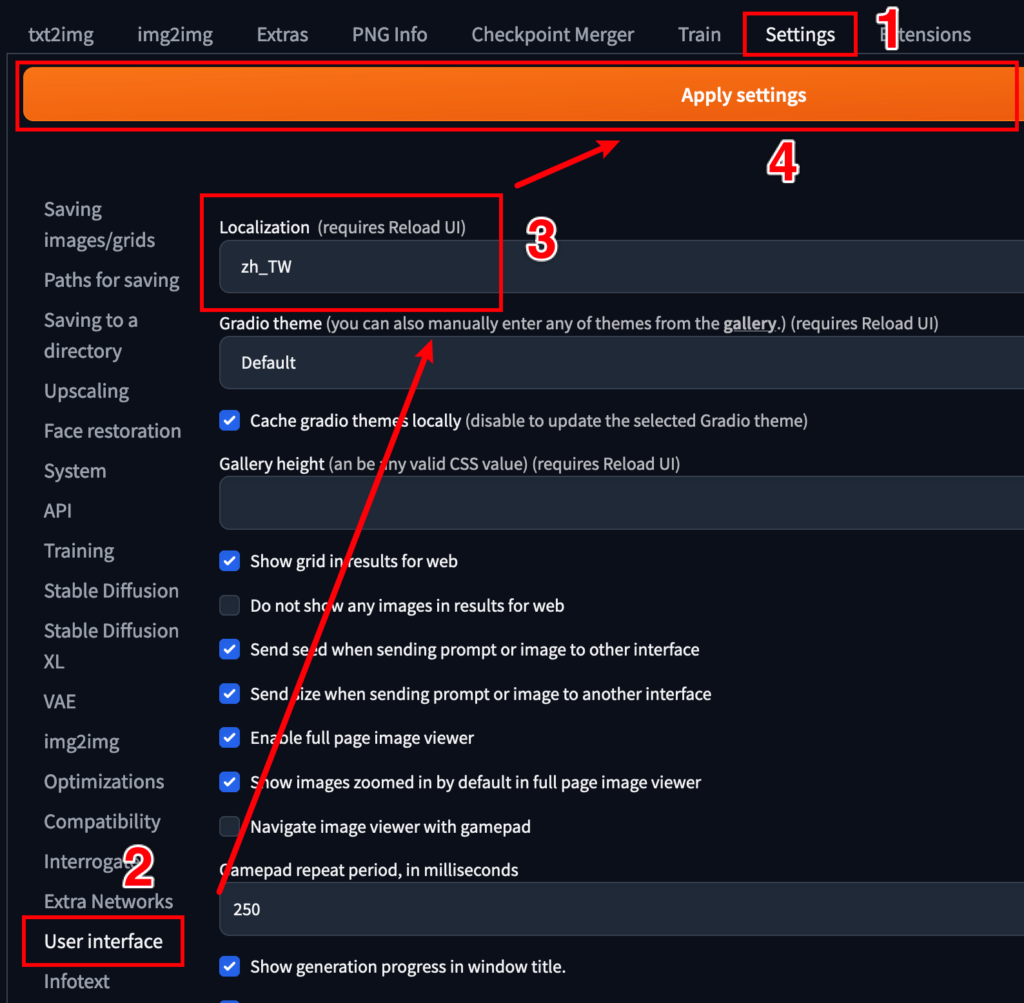
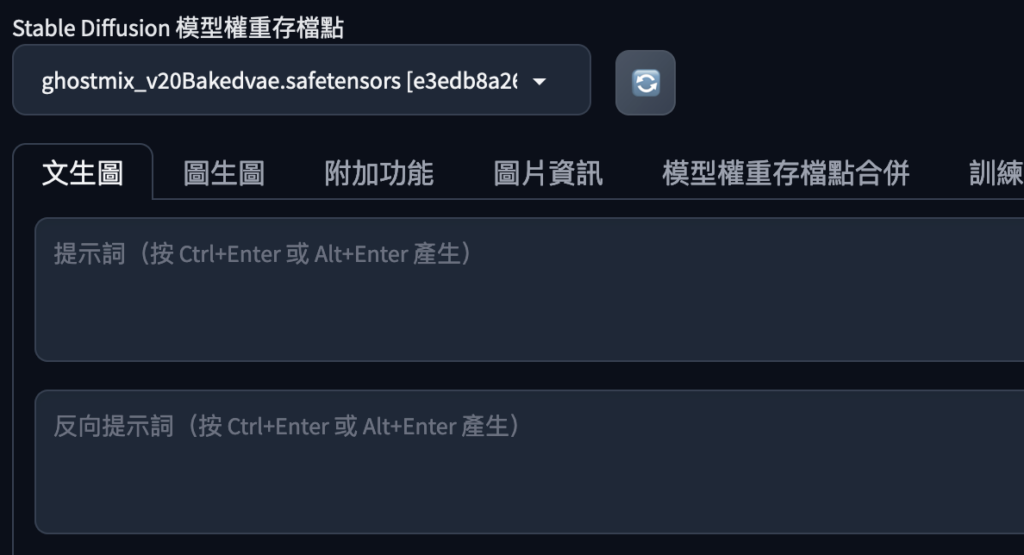
4.如果重啟後沒有變成中文化介面,需要自行到 Settings -> User Interface -> Localization 切換然後按 Apply settings -> Reload UI
雙語對照
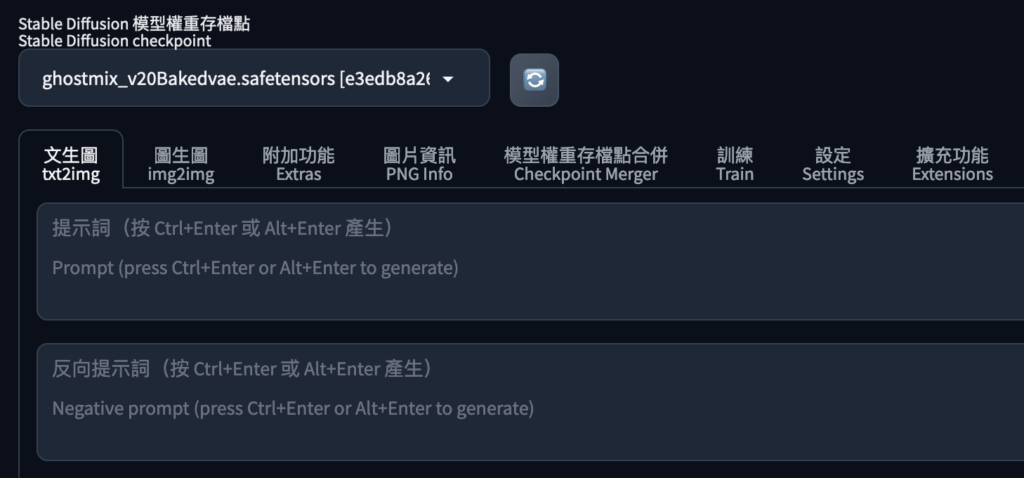
單純轉為中文化介面的話可能會無法與原文對上號,所以建議再安裝雙語對照擴充。
1.先將 Settings -> User Interface -> Localization 切成 None
2.Extensions -> Install from URL -> Install
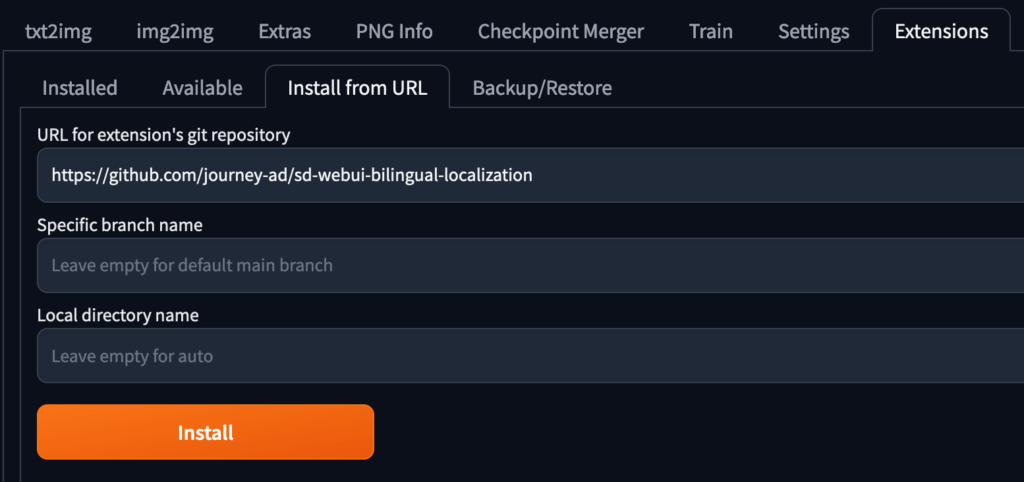
3.Installed -> Apply and restart UI

4.找到 Settings 左側會多了一個 Bilingual Localization 的標籤頁,將語言切成 zh_TW 之後 Apply settings -> Reload UI 即可。

Troubleshooting
extension access disabled because of command line flags
安裝擴展時可能會出現這個錯誤訊息:
AssertionError: extension access disabled because of command line flags解決方式:
確認你有沒有使用 --share 或 --listen 命令,有的話把它刪除再重啟。
export COMMANDLINE_ARGS="--medvram --opt-split-attention --skip-torch-cuda-test --skip-version-check --no-half"





![[Weekly] 11/27-12/03 本周紀錄 27 weekly-banner](https://www.may-notes.com/wp-content/uploads/2023/10/jazmin-quaynor-18mUXUS8ksI-unsplash-150x150.jpg)
